Claims Set-up Options
Working With Claim Letters - CLM 10
Working with Status Descriptions - CLM 11
Working with User-Defined Item Information - CLM 12
Working with Global Settings - CLM 13
Working With Claim Letters - CLM 10
This area is where the default claim letters are created. You can create letters that deal with every aspect of the claims process; from acknowledging receipt of the claim to approving or denying it. These default letters can be copied, altered and used on specific claims.
- On the Claims Management System menu enter option 10 - Work with Letter Descriptions.
- The Work with Claims Letter File screen lists the different types of user-defined letters created in the system. When you first set up the system, no letters are listed, and you will create letters using F1.
- From this screen, You can perform several options and functions. Among the things you can do are: copy, delete, perform an inquiry, update, or check the defaults of a letter.
- To create a new claims letter, enter a Password and press F1.
- The Display Sequence tells the system the order that the letters should be displayed in, which can also represent the logical sequence in which they would be sent out. For example, a claims acknowledgment letter needs a lower sequence number than an approval or rejection letter. Two descriptions types (long and short) are provided to give more flexibility when entering, selecting, and searching for letters.
- Add the necessary information and press Enter. The new default letter is added to the listing.
- You can manually type in the letter and if it is a one time event you might need to do that. However, if this is a letter you plan on using often (as a model or template), the system provides shortcuts and links to automate the process.
- The customer codes on the left hand side of the screen tie the claim letter to information contained in the claims file. When the letter is processed, the information from the claims file is automatically inserted. The codes such as @A and @B are considered header codes, while other codes such as ?A and ?B are considered detail line codes.
- You can use these codes on the body of the letter to automatically insert information. Codes are used to insert the claim number (&A) customer name (@A), the supplier number (&B), and the consumer's first name (*A).
- Another set of codes pertains to the details about the item(s) on the claim. These codes are linked to the detail lines of the Item Information Screen. In effect, each detail line code represents one of the items on the claim.
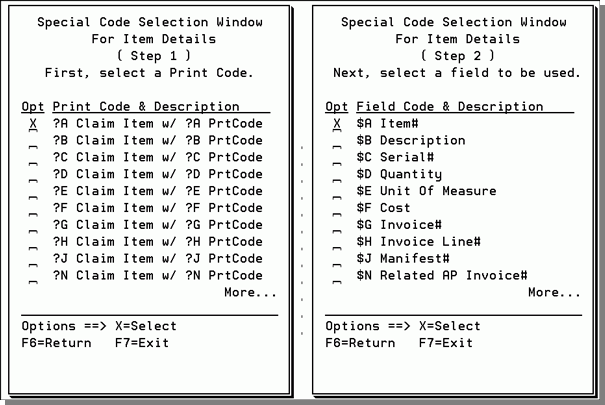
- Notice all the codes relate back to the item information. As mentioned earlier, the item area is the only area of the claims system that is linked to these codes at the present time. When more areas are tied in, some of the codes might read: ?B Claim Supplier or ?C Claim Consumer. Enter an X in an Opt field and press Enter. Another code screen appears, but behind the scenes you are directing the system to the Item Information Screen. The new code screen allows to select fields on that screen.
- In the figure above, the code selections direct the system to use the information contained in the Item# field of the Item Information screen. Continue this process until you enter all the item information that is needed. The code string ?A$A would cause the item number of the A item (first item) to print. ?A$B causes the description of the A item (first item) to print. If there two are items on the claim, enter ?B$B to print the item description for the second item and continue this pattern for any additional item information (i.e. ?C$C for a third item).
- When a letter is printed, all of the special codes are replaced with the information that is represented by the codes. You may use a single letter for multiple claims, because the specific information (such as name of customer and products) is retrieved from each different claim.
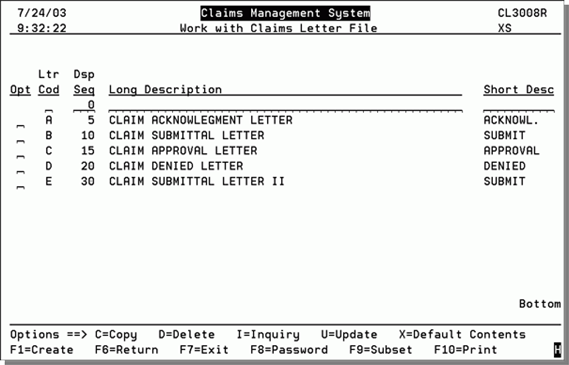
If there is a letter that is similar to the one you are creating, you can use the C=Copy option and then rename it and make the changes as needed.
Consider the letter in the figure below. It details how a typical letter can be set-up.
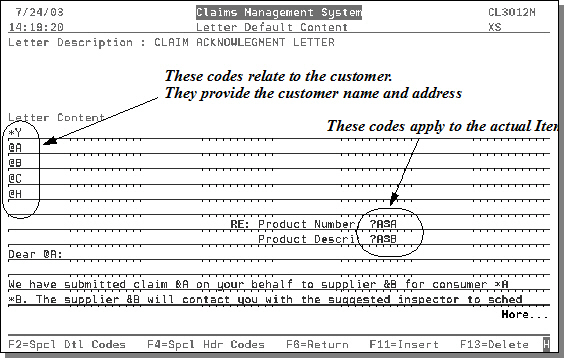
To access a list of all the available header codes, press F4.
These codes are accessed by pressing F2 - Spcl Dtl Codes.
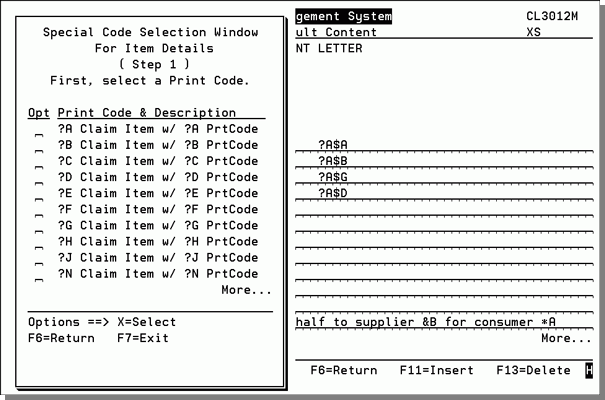
When using the special codes, there is no text wrapping. You need to space the letter accordingly.
Working with Status Descriptions - CLM 11
This part of the system lets you update or create new status codes. These codes and their descriptions are displayed on far left of the Work with Claims screen. They are also used when a claim has a status code change. By using status codes, you can create your own set of steps that each claim must go through. Status codes represent your business logic for processing claims.
1. On the Claims Management System screen, enter option 11 - Work with Status Descriptions.
2. The Work with Claims Status File screen lists the statuses that have already been created. Some of them could be user-defined and some are system defined. The system-defined codes are A, X, Y, and Z. You cannot change or remove these codes.

3. Press F1 to create a new status code.
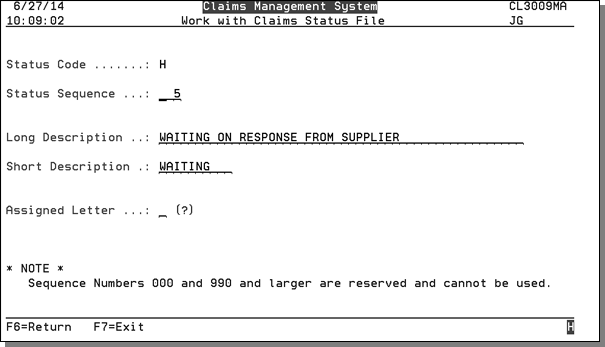
4. Entries in all the fields are required except for Assigned Letter.
- The Status Code can be any one position alpha or numeric character that is not already being used.
- The Status Sequence determines the order of how the codes are listed and prioritized. A lower number means the code is displayed near the top of the list and has priority. The priority is synonymous with the sequence of statuses that a claim must go through. These numbers can be one, two or three digits numbers, from 1-989. When working with claims, the system recognizes if you have gone back a status by the sequence number. Going backwards through statuses is permitted, but you are always warned that you are going backwards.
- The Long Description and Short Description are used in different places in the system. Make the descriptions as meaningful as possible.
- The Assigned Letter signifies the status code is used mainly for one type of claim letter. To display a listing of all the available letters, enter a ? in the field and press Enter. This entry ties a status back to a letter type (i.e., acknowledgment sent, claim denied).
Working with User-Defined Item Information - CLM 12
This part of the set-up enables you to establish and define information based on your business practices and products. This information can help organize and gather additional data on claims. For example, if you want to measure the claims against your products in relation to foot traffic, you can establish a Traffic header and then define it further.
This information is accessed during the claims process using the X=More Details function.
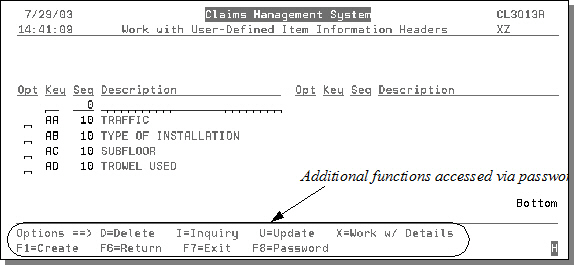
- On the Claims Management System menu, enter option 12 - Work w/User-Defined Item Information. The screen that appears lists the user-defined items in the system.
- Enter a password to display more functions at the bottom of the screen.
- This screen is basically a list of user-defined fields, which are used in the claims process. From this screen, you can delete, inquire on, update, or create information.
- Enter an X to drill down into one of the information headers and see the details underneath it.
- Add detail keys and descriptions as needed. The Dtl Key is a two character code that represents the value that is keyed in the Description field. You can think of TRAFFIC as a user defined category, and LIGHT, MODERATE, HEAVY, and EXTRA HEAVY as the allowable values for TRAFFIC.
Working with Global Settings - CLM 13
This area allows you to establish mandatory entry fields. There are five fields that can be made mandatory.
- Installer Name
- Consumer Name
- Inspector Name
- Sales Rep
- Customer Srv Rep

For more information on where these mandatory fields are used in the claims process, refer to Working with Claims - CLM 1.
The Dft Print Code Value should be set to ?A. This ensures that the item information is printed on letters that require item information. The default value is inserted into the item information area. Print code ?A references the first item on the claim. Print code ?B is used to reference the second item on the claim, and so on.
If the Allow Claim status change to Approval without Approval dollars field is flagged to N, when you change the status to approve, the system checks to make sure there is an approved amount. If it is set to Y, then an approved amount is not required.
